
Vexing problems are sometimes set aside to deal with at another time.
Let’s begin at the beginning. Since moving into the ITCC I have had the pleasure of using some 4K monitors (these Sharps
So how does a Retina display figure into this post? Well, one of the problems (believe me the benefits outweigh the problems) is that some programs don’t know how to handle Retina, or HiDPI mode. HiDPI mode is essentially taking a high resolution and squeezing it into a smaller resolution. In this case squeezing 4K of resolution (3840×2160 or 2160p) down to a 1080p screen.
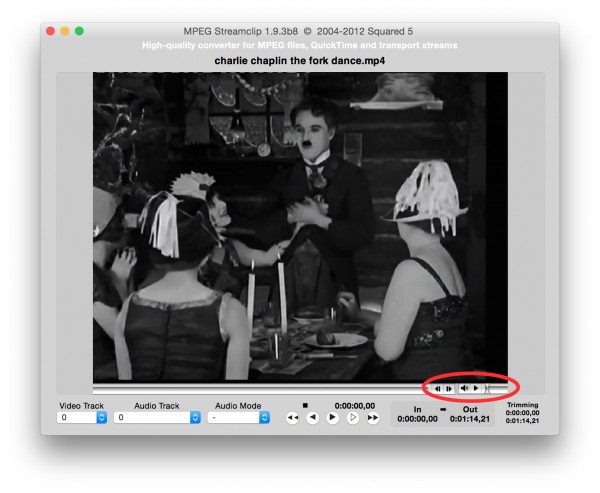
One example of a program that doesn’t handle HiDPI correctly is MPEG Streamclip, one of our favorite free programs we use to manipulate video. I wanted to do a screencast on the Mac Pro about MPEG Streamclip and it wasn’t behaving properly in HiDPI mode. The playbar was split and a small slice, including the “play” button, was off to the right, like this:
I then had two choices. I could do the screencast at 4K resolution, which isn’t a good choice at this point in time (just trust me), or I could record it on another machine that isn’t using a Retina display. I wound up using a 21″ iMac that has a native resolution of 1080p (1920×1080). The resulting screencast is on YouTube.
The MPEG Streamclip/HiDPI problem was put on the back burner, but I eventually wanted to research if/how I could do screencasts with these problematic programs on my new Mac Pro (actually UMW’s new Mac Pro).
Today I was doing some clean-up on a website that is being resurrected – the Digital Media Cookbook site (yet another post is brewing about that). I was using a program called Image2icon. I wanted to create a new “favicon” for the site and knew that the “Pro” version (It’s $4.00 if you’re interested) of this program would do it. However, it wasn’t working. On their support page, an FAQ entry talked about an issue the program had on Yosemite, the latest Mac OS. It talks about enabling the program to “open in low resolution” mode. After that, Image2icon created my favicon without a hitch.
This got me thinking, is there a “Open in Low Resolution” checkbox for MPEG Streamclip? Take a look below to see the answer:
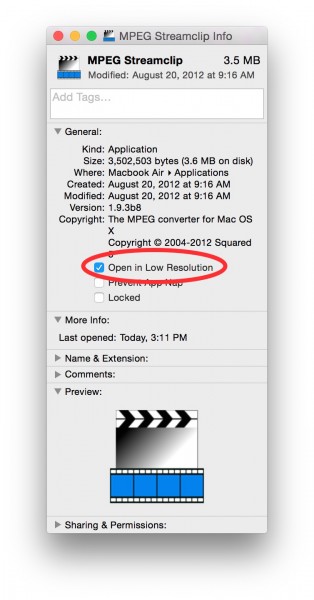
You right click on the program in the Applications folder and choose Get Info, then click the checkbox for “Open in Low Resolution”.
Two problems solved in one day! And now I don’t have to use another machine for screencasting. I can use HiDPI mode on any machine, including my home machine which coincidentally has a Dell 4K monitor
Gotcha squashed!
creative commons licensed ( BY-NC-ND ) flickr photo shared by Chad Horwedel
2 Responses
Make that three problems! I’ve been unable to use MPEGStream Clip since I got a Retina Mac Pro in April because of that screen split. I tried for a while to compress the window but the controls never worked. I found no answers online. It worked on my Mountain Lion older MBP so I thought it was Mavericks.
I gave up.
Thanks Andy, I can get back to trimming clips and stuff.
You rock (but you should blog more)
CogDog – I saw one thread that had the answer online that was from 2013. It was funny because someone offered the answer – to check the box “Open in Low Resolution” – but the questioner thought that meant to open the VIDEO in low resolution and they didn’t want to do that – here’s the link – http://forums.macrumors.com/showthread.php?t=1575086
Never give up!