Transition. It can be fun. Frustrating. Overwhelming. Invigorating. All those and many other things. For me it’s always about the next step. No one I know is more critical of me than me. One of the “criticisms” I hear – in a total teasing, smack-down, weirdly motivating and one-upsmanship way – is that I, and other DTLTers, should be blogging more. And it’s true. We’re all doing good work and we should be sharing what we’re doing. Especially now.
So in that vein of sharing, I will start with an update to something I’ve gone back to well on many times – The Kit.
For those of you who don’t know what “The Kit” is, it’s basically a live video stream setup that is as compact and portable (and inexpensive) as possible. At the time that I first gave it the name, The Kit was a backpack with a Mac laptop and a Canon video camera. The only thing that didn’t fit in the backpack was a good, sturdy, Manfrotto tripod. What made the live-streaming all work was a piece of software on the laptop called Wirecast. The limiting thing, however, was that multiple cameras was difficult (not enough “inputs” on the laptop – firewire only goes so far). That, and the on-the-fly encoding and streaming that Wirecast was providing, and it would tax the computer well beyond its CPU capabilities. Reliability was an issue at times, especially if we wanted to push the capabilities (something we do in DTLT all the time).
The Kit made its debut in 2011 and remained largely comprised of the basic set of components – until we began to get ready to move into the ITCC. As part of the research I was doing into the production spaces that would be a part of the new building, I came across what were essentially hardware solutions to what the software-based kit provided. In many ways the production spaces of the ITCC are relatively expensive. I still wanted to maintain a relatively inexpensive “Kit”, and of course, keep it portable.
Many weeks ago, Jim Groom asked me if I would provide the live-stream for the 2nd Edition of the Open VA Conference in Virginia Beach. The main reason I said “absolutely” was to meet the challenge of the next version of the Kit, and to provide a multi-camera setup. I’ll be honest, a side reason I said yes was the “beach” part 😉
So enough of the reasons, let’s get to what the Open VA version of the Kit looked like. Here’s a fast and loose video I put together of what I envisioned I would use, and following that a list of the individual equipment used (the actual implementation was scaled back a bit):
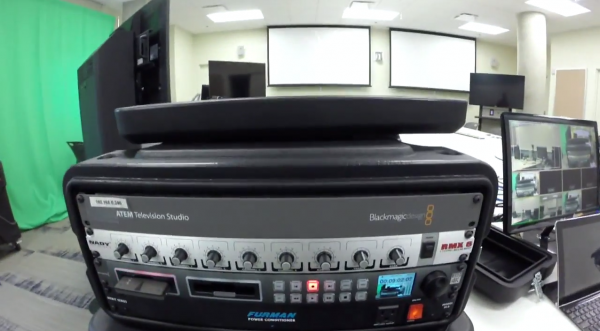
Rack
- Blackmagic Design (BMD) ATEM Television Studio – This is the heart of the system. More about this item below.
- BMD Hyperdeck Shuttle Pro – records to SSD hard drives in ProRes format
- Furman Power Conditioner – provides clean power
- Nady 6-Channel Rack Mount Mixer (not currently used – don’t know if we ever will)
- Includes 4U Case, AV cables (HDMI & SDI), ethernet cable
Camera Setup
- Asus HDMI monitor – used for “Multiview” (Program/Preview monitor).
- Canon Vixia HV40 camera (2) – generally any HDMI camera will do – the HDMI cameras are cheaper than any SDI model which start at over $2000.
- BMD Mini-Converter HDMI to SDI (2) – we have to use these to get the signal converted into SDI for long runs. HDMI cables over 10’ or so just don’t work in this case.
- Manfrotto tripods (2) – Model 055XPRO B w/ 701HDV head – classic solid tripods
- HDMI cables (2) – out from camera into mini-converters.
- Power Strips (2) – power the cameras and mini-converters.
Other Equipment
- Backpack – Carry cameras, power supplies, converters, etc.
- Computer (and software) to control switcher interface – we use a Macbook Air or Pro Can be a Mac or Windows. Computer connects via ethernet to ATEM switcher.
- Also we have Photoshop on this computer as well. Provides On-air graphics editing that can be exported to ATEM Media Player.
- Ethernet cable – for above connection.
- MagSafe Power adapter for Macbook Pro
- Mac Mini – for “computer source” images (slides, web pages, video, etc.)
- TP-LINK Wireless router – I set up an ad-hoc network for the ATEM. Various devices can connect to control the switcher, such as iPads, iPhones, other computers.
- Live Stream Hardware – we use a Teredek VidiU w/Ethernet cable & HDMI cable – It’s $700 but this makes it so easy to stream to various CDNs like YouTube. Software solutions exist such as Wirecast.
- DVI cable – we used this to get a direct view to Mac Mini. Hard to see detail on Mac on the “Multiview” monitor.
- Mackie 402VLZ4 4-Channel mixer – great small footprint mixer that takes room audio in then we go out to cameras.
- Stereo RCA to 3.5mm – we run this cable from the mixer to the Canon Vixia to provide “system” audio (it runs via HDMI/SDI to ATEM switcher). Obviously individual channels direct in would be better. This requires separate interface hardware to do analog to digital (AES/EBU) for ATEM Television Studio. A whole other conversation.
The Blackmagic Design ATEM Television Studio is one of those unique pieces of hardware that has almost a cult following, and I think with good reason. It is a 6 input (HD) switcher for less than $1000. Nothing else can touch that price point. It has so much built into such a small footprint, and the quality is outstanding. Keep in mind when you buy one of these, there are pieces that need to be added on if you get into a complex production, which the multiple inputs beg you to do. If you’re using only one camera, there’s really no need to use the ATEM. If you’re using two cameras, and you have them in close proximity (using HDMI cables of less than 10 feet) to the switcher, the ATEM is ideal. With more cameras, or cameras at a greater distance from the switcher, you need to do SDI, and hence you need to convert the HDMI camera into SDI. The BlackMagic Design HDMI to SDI Mini-converter does the trick here. For about $300 they turn an inexpensive camcorder into a serviceable production camera. Inexpensive camcorders don’t have the power to send an HDMI signal long distances (again we’re talking over 10-15 feet), so SDI must be used.
I’ll talk more about how I’m using this kit, as well as future iterations, but here’s an example of one of the live streams at Open VA (featuring several of my DTLT colleagues):